
Having Fun with Pantographs: Color Book Quilts
In the past few years I’ve seen more and more paint and ink being used on quilts. I’ve noticed it mostly on quilts custom stitched from the front of the machine. But, I’m a pantograph lady, I love the ease of knowing where I’m going and what I’ll find at the end of the row. Several years ago as Angela stitched our “Dawgs” pictogram (non-repeating pantograph) over the expanse of a Big Block quilt I thought how fun it would be to color it like a coloring book—I must admit childhood memories play it big in my mind! I seem to watch them play out, just like a television show. I remember one Spring I was very sick and had to wear dark glasses for a month to protect my eyes. Because I couldn’t go out, Mom let me slide the glasses up and take a peek at the Easter dress hanging on the bedroom sconce. For entertainment she bought me lots of new coloring books and crayons. One afternoon on the bed I sneaked a look and saw, to my chagrin; I had colored the pig orange! Those pesky glasses!
You probably have memories of coloring too. Was your technique to apply a firm line around each color area and then lightly “shade in” the entire space? Or were you like me and made each color a solid, full strength statement? Later I learned about shading and could deftly change hues or tints in the pictures I decorated. I confess I always maintained the bold look. Don’t get me wrong—I admire pastel tints but even my figure (sob!) is bold. When we tried out crayons on small fabric samples in our local quilt guild meeting and then ironed them for permanence, mine was definitely the most intense.
Well, back to the subject. I decided to color the Dog-Patch Quilt to make it more interesting. Remember it was already quilted with a pictogram that offered a collage of doggie faces replete with flopping tongues, sniffing noses, and shaggy ears. I limited the coloring to certain areas. That meant sometimes a dog’s face would be only partially painted and the rest only outlined with stitching. I admit it was scary. I feared I might ruin an otherwise great quilt. At that time our pool table was still in the basement and hadn’t been banished to the garage to make way for my longarm machine. So I spread a tarp and plastic drop cloth over it and laid out the quilt. Nervously, I positioned flat, black trash bags over the areas I wanted to protect. Shiva Paintstiks were the medium I chose because, as usual, I wanted strong color. I rubbed the Paintstik onto the page of a disposable palette and then brushed it onto the fabric with a flat, short bristled, oil paint brush. My 19-year-old son came down to watch TV and stood stunned. “Mom, you can paint!”, he exclaimed. I laughed and said, “Well yes, I was an art major. You’ve just never seen me paint before.” (Isn’t it great when you get a little praise—especially from your kids! That can be a rarity until they’re old enough to appreciate you!)
Face by face, the dog’s expressions began to emerge and take life. By the end of the experiment I was thrilled. This had made my otherwise “lovely” quilt truly standout as being unique. I’m so glad I took the first step – or brushstroke!

I was hooked and eager to paint on another quilt. I pulled out my Westward Ho Quilt that had already been quilted and painted the “campfire” and “spokes” of the wagon wheel giving it a stronger focal point. I was reliving the coloring book experience of my childhood all over again – each time with successful results!


Soon after, I found myself rushing around, trying to get my Dino-Spinners Quilt with the “Dinosauria” pattern ready to send
off to a show. I suddenly realized the quilt had no label. So I turned it over and picked out a stitched dinosaur on the back, painted it with the Paintstiks, and “presto” I had a super looking, automatic label!

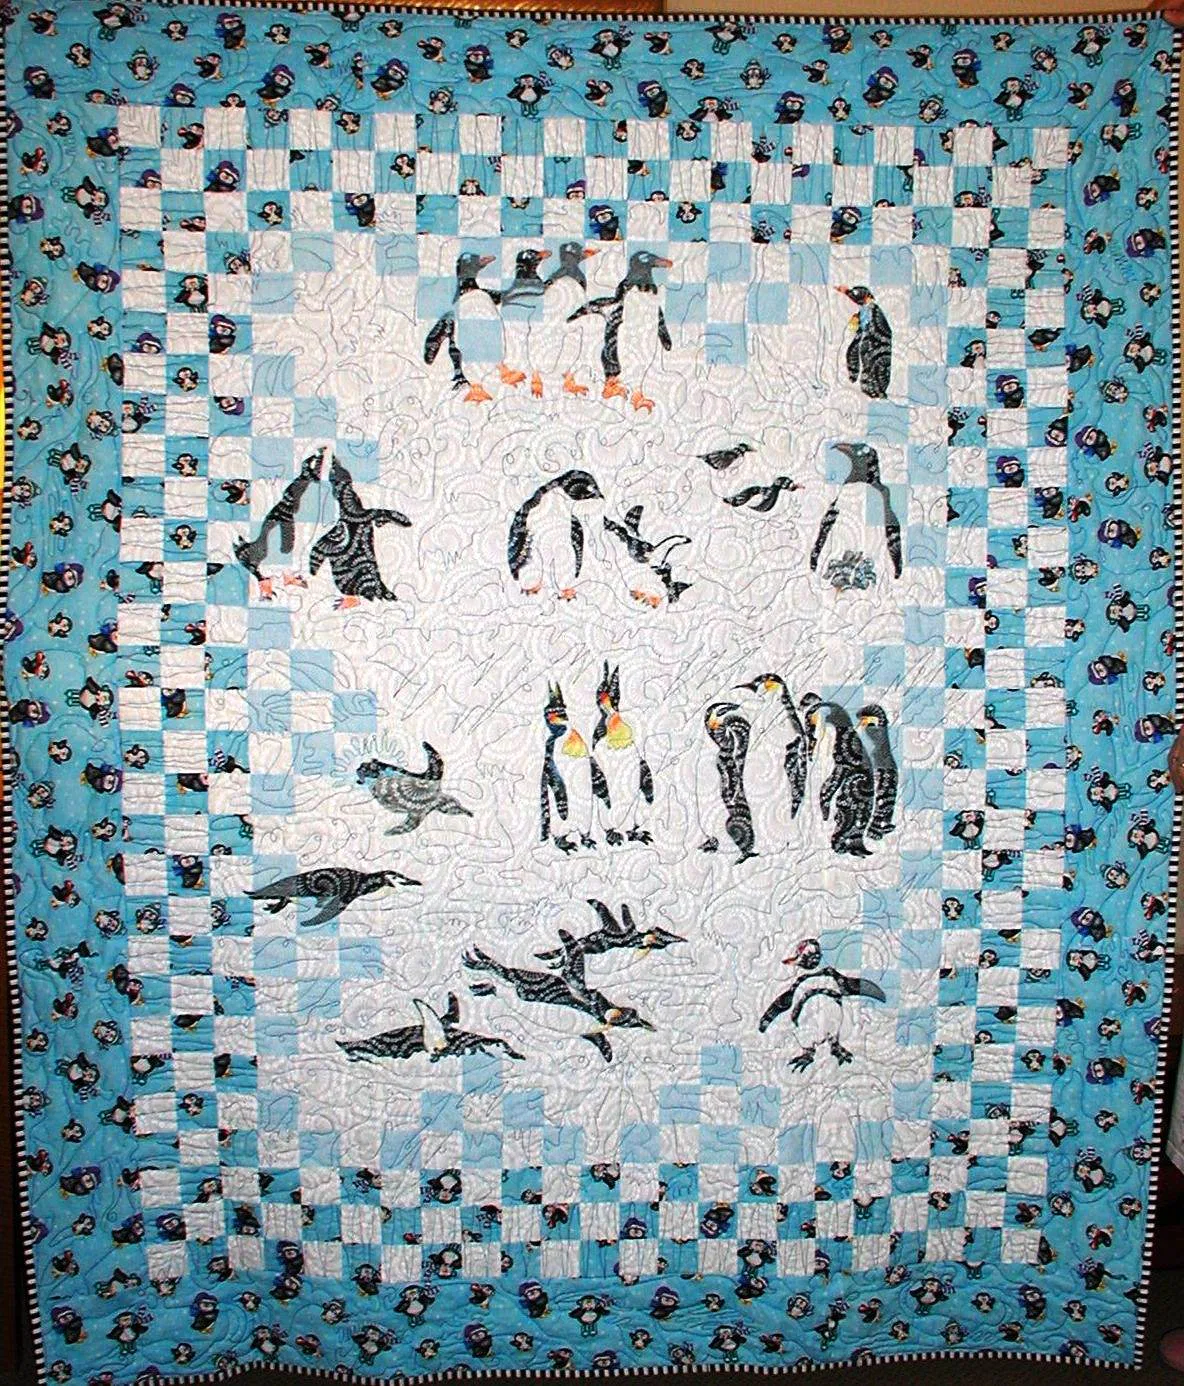
My friend Patti Buhler (Quiltedartsstudio.com) promotes and sells Tsukineko Inks so I decided to try those as my next medium of choice. I pieced together a simple quilt of penguin fabric, and white-on-white with plenty of open spaces. Over the quilt top I stitched the “Penguins on Parade” pictogram. Then going back into the central white area, I picked out key penguin figures and painted them black with the amazingly easy, Inkstick Marker that comes with each bottle of Tsukineko Ink. Serendipity! – As I inked in the black penguins, I found, as I had secretly hoped, the stamped on design in the white on white fabric resisted the ink, leaving a white design within the blackened area! (Viewers always get up close and exclaim, “Did you appliqué this one?” It looks like a different fabric.) Finally, I used a little orange, red, and yellow to define the fluff on the penguin feathers and again, instant success! And I mean instant! I didn’t have to wait 4-5 days for the paint to dry. Ink dries in minutes. (Well, I didn’t actually wait that long on the Dog-Patch Quilt anyway, because of my impatient nature.) A few years later I went back and decided to apply white glitter over my Penguin Snowstorm Quilt. I did this as an “added layer of interest” as I always say to viewers.


The next time I tried the inks was on the backside of a Nativity quilt stitched with the “Joyful Birth” Pictogram.. I had stitched and appliquéd over the front and then, realizing the back was quilted with a pale batik, decided to color in some of the “Pictures” on the back. I generally don’t color in the entire quilt. I just pick motifs I want to emphasize. (Maybe you’ll want to color more.) The results were amazing! Just like the white-on-white, there was enough of the residual wax left in the batik so that those designs resisted the inks too. Now this quilt is “reversible”and some of us like the back best! 
When you stitch with pantographs and pictograms there is an automatic coloring book effect created. Pictures are already stitched into the fabric of your quilt by the quitting machine. Adding colors to the designs you’ve stitched is easy. And they do add extra spark and appeal to the quilt. I’ll be using these techniques on more quilts. I hope you will too!
Shiva Paintstiks have a wax base and aren’t as oily as oil pastels or actual oil paints. Don’t try the latter or the oil will seep into the surrounding fabric leaving an unsightly ring around the painted area. The Paintstiks keep for years if you wrap them in plastic or place then in a tight can to prevent drying out. Paintstiks come individually or in sets.
Tsukineko Inks come in little one ounce bottles in a whole rainbow of colors, solid, sheer, pearlescent, and metallic. Just choose your color and dip the tip of the reloadable “inkstick” into the bottle. Use it like a magic marker. Don’t get right up to the stitching line, the ink will move toward it and happily, in almost all cases, will not pass the stitched line. Caution: do not thin the paints with water or they will “bleed” more easily into unwanted areas. If you want a pastel or transparent color mix a few drops of the ink with clear Aloe Vera Gel and brush it on. Or if you’re trying for a watercolor wash effect, paint some gel onto the quilt first and then apply the ink.
Of course one must always heat set the painted surfaces whether you are using Paintstiks or Inks to render them permanent and washable. To heat set my quilts, I place brown wrapping paper under the quilt on an ironing surface and place additional paper on top. Then I iron from the top. The heat, applied from the top, draws any loose oil towards the heat source and into the top paper.
Remember the serendipity effect: white-on-white printing will repel the ink. This is also true of some “authentic” batiks which often have residual wax still left in the fabric. Have fun with your next “grown-up” coloring book! Judy